There was a time where quite the megapixel race was going on. Every new camera would have an additional one million pixels more than the previous model, and along with it came the hope that now we could take even better photos than before. Of course, that hope was renewed some months later when another camera with yet higher megapixels was released.
These days camera manufacturers have changed their approach a little bit. No longer is a new model introduced to replace the previous model every year with a simple one megapixel change. Many models are lasting for several years between replacements and, if they don’t last that long, it’s because a newer model with new features is released, often times still using the same sensor as its predecessor. When a new sensor with higher megapixels is used it is often an appreciable jump in megapixels as opposed to 1MP incremental hops.
Even still, each time a new camera comes out with higher megapixels than the last we get excited by the idea of being able to take better pictures than before. It’s common to wonder, with all those pixels, how large of a print can I make? If you have a 16MP camera how large will that print? What about a 24MP camera, a 45MP camera, what size prints can you make from those? All reasonable questions.
SOAP BOX TIME: Let me state it up front that more megapixels does not mean you will necessarily get better photographs. It may represent the potential to get better photographs, but it requires you to bring that potential to life. Do you want to make the best investment possible into your photography? Then don’t seek more megapixels. In fact, don’t seek any megapixels. Instead, buy a manual film camera and learn what aperture, film speed, and shutter speed are and how they relate to and affect one another. Learn how to use them and control them at will. Then go buy whatever digital camera you want. </soapbox>
Before we start talking about print sizes, let me explain a few things that have a major impact on your photo quality that you may never consider, and camera manufacturers know how much of an impact these things have since they are the areas where they are making improvements from one camera model to the next. In fact, it just may be that these things will impact your image, and therefore print, quality more so than resolution.
COLOR:
Cameras don’t see the world the same way we do. Where our eyes can see millions and millions of colors with a fine gradient between one color and the next the camera doesn’t work the same way. This means that some colors will be captured as the closest thing the camera has the capability of showing.
An example I’ve used in the past is to consider a rainbow. If you had a camera that could only capture red and blue then a photo of your rainbow wouldn’t look so hot, not matter how many megapixels it had. If your camera could show all of those colors perfectly then you could get a beautiful, vivid print of the rainbow. Below are two color wheels. The wheel on the right is an approximation of how the color wheel would look if it only contained about 100 colors. You can see how this would affect an image.
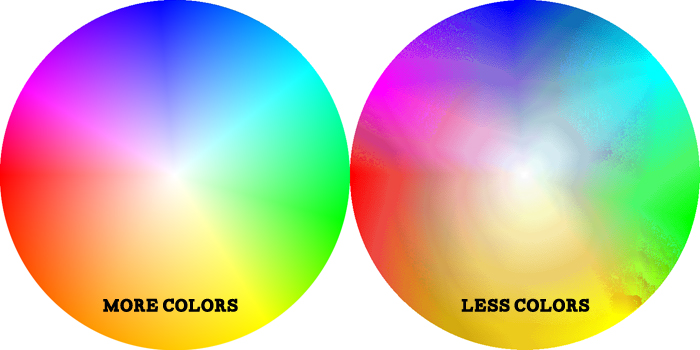
Compressed Colors
As camera manufacturers introduce newer camera models they usually come along with an improved ability to show a range and nuance of colors. This means the camera can see more colors than before and can show finer differences between one color and another, and this will lead to better prints, independent of megapixels.
In general certain types of cameras are better than other at color. For example, a cell phone will not be able to show the color that a high end DSLR shooting RAW files will (though this is rapidly changing as smartphone manufacturers are driving innovation in camera tech), and this will show in the final images even if the phone has more pixels than the camera.
In short, would you rather show a massive print with terrible color or a medium sized print with fantastic color?
FILE TYPE AND COMPRESSION:
Do you shoot jpeg or do you shoot RAW? Why does it matter? This is another popular topic and a place where camera manufacturers are steadily making improvements.
To be very quick and simplistic, when you shoot RAW the camera saves all the information the camera collected over the entire exposure, which may only be 1000/sec. or could be several minutes. This means you can go back and access some of that information if you need it for something such as recovering a bright area where the detail was blown out or a dark area where detail was rendered as just a black blob (note digital cameras tend to contain amazing amount of detail in dark shadows that can be brought out, but are more susceptible to bright highlights being blown out and the detail lost. When shooting digitally it is a good idea to shoot with the aim of preserving the brightest parts of the image). This results in larger files and requires you to have an editing program and some editing knowledge. However, you can then save the files yourself as something like a tiff file that will maintain quality; you get to keep all the information your camera collected and do with it as you please.
On the other hand, if you shoot jpeg then the camera will make an approximation of how the photo should look and then throw away all the information it deems not needed. This is called compression, which results in a smaller file, but also gets rid of information you may benefit from having. Also, did you know that every time you re-save a jpeg file it can re-compress which leads to file degradation over time?
It is important to note that this is another area of advancement and camera manufacturers are putting out cameras that get better and better at producing good jpeg files straight out of the camera.
So how does this affect your prints? Basically, the compression from jpeg files can sometimes introduce artifacts that show up as areas that look “boxy” or almost “pixellated” where it hasn’t maintained a smooth gradient from one area to the next. The jpeg can “lose” colors. The larger you print, the more noticeable all this is. So you still have just as many megapixels, but quality issues introduced from the file type will limit how large you can print and still look good. This will not always occur of course, but it something over which you’ll have no control if you shoot jpeg and then edit your images. Below you can see an intentionally exaggerated example of this (you may have noticed this in your own photos).
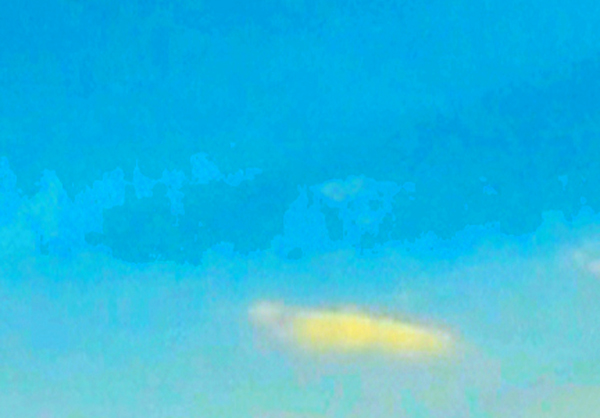
“Stair Step” Pattern
NOISE / ISO:
When the Nikon D3 came out forever ago it changed the landscape of digital photography. It was “only” 12 megapixels but it could shoot at what were very high ISOs at the time and produce a really great image unlike anything we’d seen before.
ISO is another way of effectively saying “how sensitive to light the camera is”. Consider this, you aren’t always outside in bright sun, so what if you’re inside where it is quite dark, how can the camera still take photos? Basically, by increasing your ISO you can shoot in darker areas and capture photos where you previously may have been unable.
The downside to this is that the more “sensitive to light” you make the camera the more you affect the quality with what we call noise. Noise is essentially interference and lack of proper exposure to light, and it can come across in your photos usually in two ways.
One type of noise we call luminance noise, which basically just looks like film grain. The other is color noise, which often times looks like green and magenta splotches throughout the photo. Below you can see an example of both, exaggerated for purposes of demonstration.
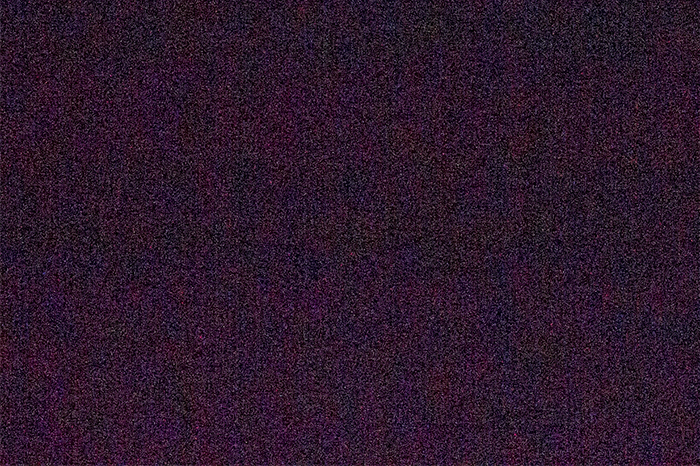
Color and Luminance Noise
So what bearing on printing does this have? Well, the more noise in your image usually the more detail that is lost and the smaller you can make a print before these quality issues become apparent. To combat this you will benefit from keeping the ISO as low as possible and having a camera that has very good noise performance (and of course properly exposing your image).
Camera companies have made dramatic improvements in their cameras abilities to take photos as higher ISO, thus expanding the usability of the cameras, while still maintaining quality. In fact, I’d argue that ISO improvements have been the most significant advances made in image quality in the past several years.
To make this more practical, the less noise, the more detail, the better color, the better print. If you have lots of pixels but they have bad color loss and lots of noise then your print will not look as good as if you have fewer pixels but they have great color and clarity.
DYNAMIC RANGE:
Dynamic what? This is one many people don’t even know about yet nearly every photo they take is affected by it.
Remember earlier when we were talking about color and I mentioned that the camera doesn’t see the world the same way we do? This is a similar situation, but it is about brightness and darkness, not color.
Imagine you are sitting in your living room in the morning and the sun is shining brightly through the window. If you look over to the window it’s very bright, and maybe even difficult for you to see, but if you give it a second your eyes will readjust quickly and you can see the beautiful, bright sky outside. Then you walk over and look behind your couch and it’s so dark you almost can’t see what’s back there. It takes your eyes a second to adjust before you can tell what’s in the shadows. This is an example of high dynamic range. In other words, the difference between the brightest area and the darkest area is quite dramatic.
You could imagine another scenario where your entire living room is perfectly evenly lit so there’s no bright area or dark area for your eyes to adjust to. This would be a low dynamic range.
Now, whereas your eyes can automatically adjust to these brightness levels and easily see both the bright and dark areas at the same time, a camera cannot do it nearly as well. Thus, the more difference between the bright and dark areas of a photo the more difficult it will be for your camera to capture it all. You can see in the example below that the sky looks nice, but the boardwalk and ground look too dark in the photo. If you were standing here and viewing this in person you’d find that the ground wouldn’t look nearly this dark to you.
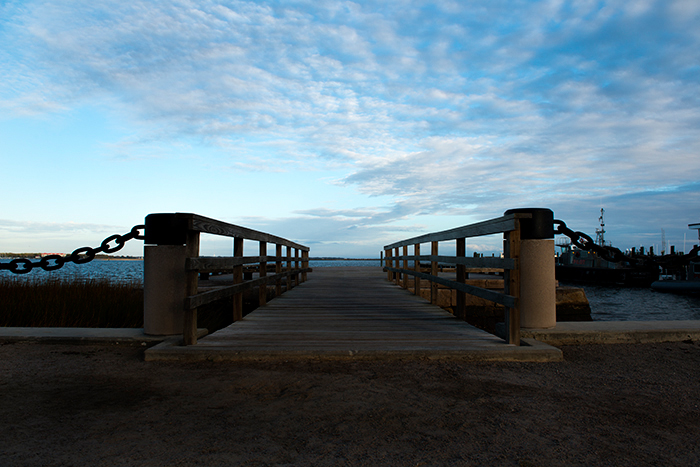
Camera Dynamic Range
This will affect print quality in a few ways. For one, the more editing that has to be done to correct these brightness differences the more you risk introducing the noise we earlier spoke of. Also, if you shot jpeg and have to do a lot of editing it can introduce the artifacts we talked about before when you brighten the photo. Furthermore, if the photo is better lit then it in general looks better in print.
Again consider, would you rather have a huge photo that has one area way too bright and another way too dark or a medium sized photo that is beautifully balanced? This is another example of how better image quality can matter more than strict resolution.
EXPOSURE:
Cameras can be used to take pictures because they are sensitive to light. But how much light does the camera need? Every scenario will call for different amounts of light, and the amount of light needed for a given photo is referred to as your exposure.
You can give the camera way too much light (overexposed) and end up with something like this:
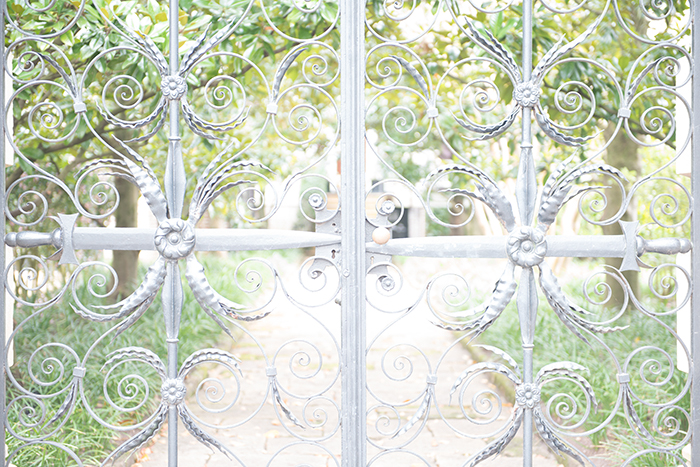
Overexposed Photo
You can also give the camera not enough light (underexposed) and end up with something like this:
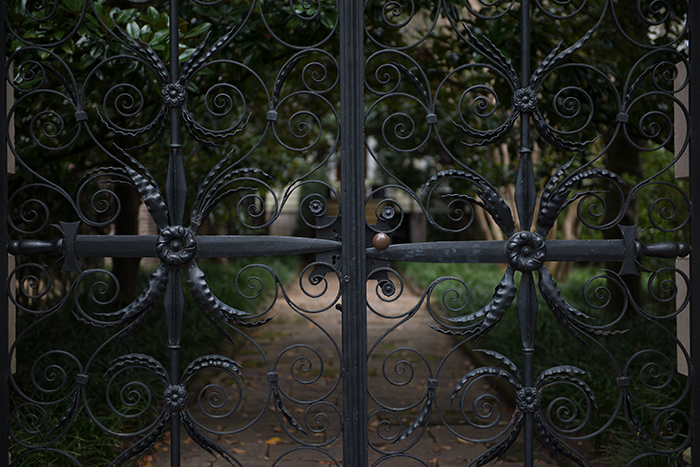
Underexposed Photo
Finally, you can properly expose the photo and get something more like this:
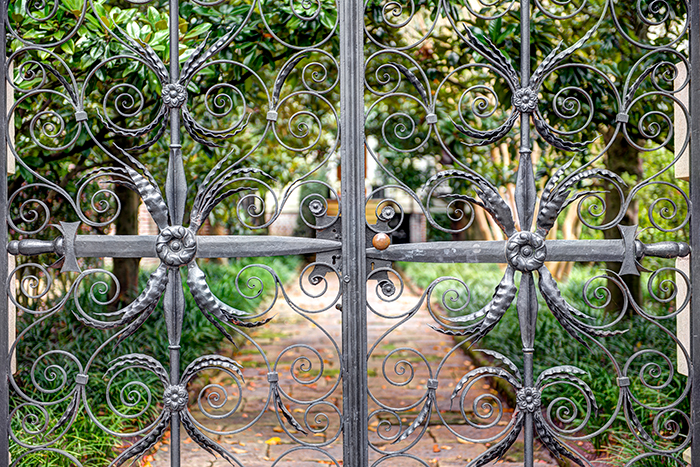
Properly Exposed Photo
You can probably tell which would make a better print, and it has nothing to do with resolution. Of course you could always edit the underexposed or overexposed image. But, did you shoot it in jpeg and so not have the additional information? Even if you shot it in RAW you can still degrade the photo by making extreme changes during editing. Majorly brightening up dark images can introduce noise that we earlier discussed, and overexposing can lose highlights that cannot be recovered.. In short, getting the exposure correct up front will always be the better approach and get you better print quality.
SHARPNESS/FOCUS:
This one is simple. Are you sure that you perfectly focused on your subject? Was your subject moving and is thus slightly blurred in the photo or was the motion completely stopped?
No matter how many pixels you have, and no matter how large that will print, it cannot make up for something being blurry. In fact, the larger you print the more noticeable this will be.
WHEW!
By now you’ve undoubtedly realized that I’ve told you all kinds of things you didn’t want to know and haven’t told you what you do want to know. I’ll let it slip that, assuming you’ve nailed everything about the exposure and file quality, then more megapixels will most likely get you a larger, better print. But that’s quite a huge assumption. How large can you print from your camera? OK, I’ll bite and address the question directly, but only with the understanding that the answer assumes that you’ve got a good file to work with.
The oversimplified answer: if you’re shooting with a camera from the last 2 years then you will probably be able to do at least a 20×30″ print and be pleased with it from a reasonable viewing distance when it’s hanging on your wall.
The theoretical answer: here are some generally accepted ideas as to what size print a given resolution will make at around 200-240 dpi. It is important to point out that some people will disagree with these numbers. Also, particularly great files will probably do much, much better. Particularly poor files will do less than this. If the print will hang on a wall so that you stand far back when viewing it then you can do much larger. If the print hangs where people will walk right up to it then you may want to stick close to these numbers, etc. So please use this just as a general guideline.
I will say I’ve printed iPhone images 40×60″ and was impressed by the quality, though I’ve also gotten photos from top of the line cameras that didn’t look very good above 8×10″, and this is all because of the things I mentioned above. Having said all that, here are some approximations:
6MP: 11×16.5
10MP: 13×19
12MP: 14×21
16MP: 16×24
24MP: 20×30
36MP: 24×36
If you’ve made it this far then you’ve already read the complicated answer, so I won’t do that to you again.
I hope this has shed some light on print quality and the myriad things that affect picture and print quality. I do wish that I could simply tell you than an X megapixel camera would make an X sized print and be done with it, but that wouldn’t be true.
Usually people end up sending us their photos to have a look over and tell them what size we are comfortable printing it, and this is exactly what we suggest you do if you are unfamiliar with looking at your files on a monitor and determining how they’ll print. We’re always happy to give you our input and even explain why if you’re interested (but be warned, we can be long winded sometimes).
As always, we’re here if you need us!
